Leveling in 3d Printers: What It Is and Is It Worth It?
As an Amazon Associate we earn from qualifying purchases. Links on this page are affiliate links.
Auto Leveling Explained Simply
Leveling explained helps you understand why your printer bed needs to be flat. The build surface must be perfectly parallel to the print head nozzle. If the gap is uneven, the first layer fails. Adhesion suffers, and prints warp or detach. Manual leveling requires you to adjust screws under the bed while sliding a piece of paper. This process is tedious and prone to error. Auto leveling removes that guesswork. The printer uses a sensor to map the bed’s height at multiple points. It calculates the deviations and adjusts the Z-axis in real time. This ensures consistent filament thickness across the entire print area. You will see this feature labeled as auto leveling, automatic bed leveling, orABL on product listings. Some listings may specify the sensor type, such as a capacitive probe, inductive sensor, or mechanical switch. The key metric is the number of points sampled during the mesh grid. More points mean a more detailed map of the surface. This data allows the printer to compensate for minor warps or imperfections in the build plate. Buyers care because it saves time and reduces failed prints. You do not need to spend ten minutes adjusting screws before every job. The printer handles the calibration automatically. This consistency is crucial for large prints or materials that are sensitive to bed temperature. It also makes the machine more accessible for beginners who might struggle with manual adjustments. When evaluating options, check if the auto leveling feature is built-in or an add-on module. Integrated systems are generally more reliable. Look for printers that mention mesh bed leveling in their specifications. This confirms the software can process the sensor data to create a correction map. Reliable auto leveling leads to better first layers and higher success rates for your projects.
Auto Leveling Printer Models
Auto Leveling
Auto leveling uses sensors to map the build plate. It adjusts the nozzle height for each point. This ensures a consistent first layer. You avoid manual screw adjustments. The Entina Tina2C Mini fits beginners. It offers a simple setup. The FLASHFORGE Adventurer 5M targets speed. It uses CoreXY mechanics. The Creality Ender 3 V3 SE provides reliable CR Touch leveling. It suits single-color prints. The Creality K2 Pro handles large multi-color jobs. It includes chamber heating. The Entina Tina2 Basic is compact. It suits kids. The Creality SPARKX offers AI monitoring. It is pre-assembled. All these models remove manual bed leveling. This saves time. It improves print success rates. You get consistent adhesion. The trade-off is sensor maintenance. You must keep the sensor clean. Calibration is still required. But it is automated. This makes printing easier for you.
Manual Leveling
Manual leveling requires you to adjust bed screws. You place a paper under the nozzle. You move the bed to find the correct gap. This process takes time. It requires patience. You must do this before every print. Some users prefer this control. They want to feel the bed themselves. However, it is error-prone. Inconsistent gaps cause failed prints. Adhesion suffers if the gap is wrong. Warping may occur. Most modern printers skip this. They use auto leveling instead. You save time. You get better results. Manual leveling is rare now. It is mostly on older or budget models. You should avoid it if possible. Auto leveling is standard. It is more reliable. You focus on printing, not setup. This guide focuses on auto leveling models. They are the better choice for most users.
Auto Leveling Worth The Upgrade
Who needs it
You should prioritize printers with auto leveling if you are new to 3D printing. Manual bed leveling is often the hardest part of the hobby. It requires patience and steady hands. You must adjust screws while watching the nozzle gap. This process is tedious and prone to error. Auto leveling sensors map the bed surface for you. They calculate the correct height at multiple points. This ensures a consistent first layer every time. You save significant time on setup. It reduces failed prints caused by poor adhesion. If you value convenience and reliability, this feature is essential. It removes the guesswork from your workflow. You can focus on designing and slicing rather than mechanical adjustments. It is ideal for users who want consistent results without technical frustration.
Who can skip it
You can skip auto leveling if you already master manual bed leveling. Experienced users often prefer direct control over the process. Manual adjustment allows for fine-tuning specific hotspots on the bed. Some users find manual leveling faster than waiting for sensor mapping. If you are on a tight budget, manual models are cheaper. You can allocate funds to a larger build volume or better materials. Prioritize a sturdy frame and reliable extruder instead. These factors impact print quality more than leveling speed. You can also skip this if you only print occasionally. The time saved by auto leveling may not justify the cost. Focus on learning proper first-layer techniques manually. It builds a deeper understanding of your machine. This skill transfers to any printer you use later.
3D Printer Leveling Glossary
Build Plate
The flat surface where your object forms. It must be level so the nozzle deposits material at a consistent height. An uneven plate causes poor adhesion or failed prints.
Nozzle Gap
The tiny distance between the print head and the bed. This spacing determines how well the first layer sticks. Too close causes clogs; too far causes weak bonding.
Manual Leveling
Adjusting bed screws by hand while observing the gap. You often use a sheet of paper to check clearance. This method requires patience and steady hands to succeed.
Auto Leveling
Using a sensor to map the bed surface automatically. The printer adjusts nozzle height for each point. This ensures a consistent first layer without manual screw adjustments.
First Layer
The initial row of plastic that anchors the print. Its quality dictates the success of the entire object. A poor first layer leads to warping, detachment, or layer shifts.
Z-Offset
The vertical distance between the nozzle tip and the bed. Correct offset ensures proper filament squish. Incorrect offset causes stringing or incomplete layers. Sensors often adjust this automatically.
Bed Parallelism
The state where the build surface is perfectly flat relative to the print head. If the bed tilts, the gap varies across the print area. This causes uneven adhesion.
Mesh Mapping
A software method that creates a 3D map of the bed. The printer uses this data to adjust height dynamically. It compensates for minor warps or uneven surfaces on the plate.
Quick picks
| # | Product | Best for | Price |
|---|---|---|---|
| 1 | Entina Tina2C Mini 3D Printer | beginners and kids needing small prints | Check price of Entina Tina2C Mini 3D Printer on Amazon |
| 2 | FLASHFORGE Adventurer 5M CoreXY 3D Printer | High-speed printing with automated bed leveling | Check price of FLASHFORGE Adventurer 5M CoreXY 3D Printer on Amazon |
| 3 | Creality Ender 3 V3 SE | single-color prints with auto leveling | Check price of Creality Ender 3 V3 SE on Amazon |
| 4 | Creality K2 Pro Multicolor 3D Printer | Large, fast, multi-color prints with chamber heating | Check price of Creality K2 Pro Multicolor 3D Printer on Amazon |
| 5 | Entina Tina2 Basic Mini 3D Printer | Small beginner prints and kids | Check price of Entina Tina2 Basic Mini 3D Printer on Amazon |
| 6 | Creality SPARKX Multicolor 3D Printer | Auto-leveling multi-color printing | Check price of Creality SPARKX Multicolor 3D Printer on Amazon |
Our 6 picks

Entina Tina2C Mini 3D Printer
Best for: beginners and kids needing small prints
- Leveling
- Auto Leveling (what this guide is about)
- Build Volume
- 3.9" x 3.9" x 3.9"
- Leveling Type
- Auto Leveling
- Compatible Material
- PLA
- Features
- Wi-Fi, Fully Assembled
- Target Audience
- Beginners, Kids
View on Amazon: Entina Tina2C Mini 3D Printer Affiliate link
The Entina Tina2C Mini is a fully assembled 3D printer designed for beginners and kids. It features auto leveling to simplify setup and a compact 3.9 x 3.9 x 3.9 inch build volume. You get WiFi connectivity for app control and offline printing options. The unit includes 1kg of PLA filament in four colors. Its small footprint and low noise make it suitable for home desks and small workspaces.
Pros
- Fully assembled for immediate use
- Auto leveling reduces manual setup
- WiFi and offline printing modes
- Includes 1kg of 4-color PLA filament
Cons
- Small 3.9 x 3.9 x 3.9 inch build volume
- Limited to PLA material compatibility
- No mention of multi-color capability
Good fit if
- You need a compact printer for a desk
- You are a beginner or parent buying for kids
- You want a fully assembled unit with auto leveling
Skip if
- You require large build volumes
- You need multi-color printing
- You want to print with materials other than PLA
Verdict: The Entina Tina2C Mini 3D Printer offers a simple, entry-level experience with auto leveling and a compact design. It fits beginners who prioritize ease of setup over large print sizes.

FLASHFORGE Adventurer 5M CoreXY 3D Printer
Best for: High-speed printing with automated bed leveling
- Leveling
- Auto Leveling (what this guide is about)
- Build Volume
- 220x220x220mm
- Print Speed
- Max 600mm/s
- Leveling Type
- Fully Auto Leveling
- Motion Structure
- CoreXY
- Extruder Type
- 280°C Direct Extruder
View on Amazon: FLASHFORGE Adventurer 5M CoreXY 3D Printer Affiliate link
The FLASHFORGE Adventurer 5M uses fully auto leveling to handle first-layer consistency without manual adjustments. It features a CoreXY motion structure and reaches max print speeds of 600mm/s. The direct extruder supports temperatures up to 280°C. You get a 220x220x220mm build volume and real-time app monitoring via Flash Studio. This setup suits users who want speed and automated bed leveling for reliable prints.
Pros
- Fully automatic bed leveling ensures consistent first layers
- CoreXY structure supports max 600mm/s print speed
- Direct extruder reaches 280°C for wider material compatibility
- Real-time monitoring and control through Flash Studio app
Cons
- 220x220x220mm build volume is smaller than some competitors
- 22-pound weight adds bulk to your workspace
- Standard 0.4mm nozzle included with optional sizes sold separately
Good fit if
- You want automatic bed leveling to simplify setup
- You need high-speed printing for rapid prototyping
- You prefer remote monitoring via a dedicated app
Skip if
- You require a build volume larger than 220mm
- You prefer manual leveling for total control
- You need a compact printer under 15 pounds
Verdict: The FLASHFORGE Adventurer 5M Auto Leveling delivers high-speed CoreXY printing with automated bed leveling for users who prioritize speed and ease of use. It fits those who want reliable first layers without manual adjustments.

Creality Ender 3 V3 SE
Best for: single-color prints with auto leveling
- Leveling
- Auto Leveling (what this guide is about)
- Print Speed
- 250mm/s
- Leveling Type
- CR Touch Auto Leveling
- Dimensions
- 13 × 13 × 16 inches
- Weight
- 19.8 pounds
View on Amazon: Creality Ender 3 V3 SE Affiliate link
The Creality Ender 3 V3 SE brings auto leveling to a compact build volume. It uses a CR Touch sensor for automatic bed leveling and strain sensor detection for Z-offset. You get a maximum print speed of 250mm/s with 2500mm/s² acceleration. The machine weighs 19.8 pounds and measures 13 by 13 by 16 inches. It suits users who want reliable auto-leveling without manual adjustment.
Pros
- CR Touch auto leveling sensor
- Strain sensor for Z-offset
- 250mm/s maximum print speed
- 2500mm/s² acceleration rate
Cons
- 13-inch build width limits large prints
- 19.8-pound weight adds bulk
- No multicolor printing support
Good fit if
- You want automatic bed leveling
- You need faster print speeds
- You prefer a compact footprint
Skip if
- You require multicolor printing
- You need a larger build volume
- You want a lightweight portable unit
Verdict: Creality Ender 3 V3 SE Auto Leveling delivers reliable CR Touch leveling and high speed for single-color projects. It fits users who value print velocity and automated setup in a small space.
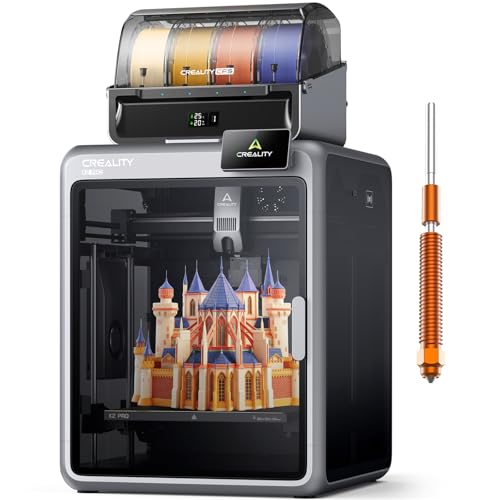
Creality K2 Pro Multicolor 3D Printer
Best for: Large, fast, multi-color prints with chamber heating
- Leveling
- Auto Leveling (what this guide is about)
- Build Volume
- 300×300×300mm
- Print Speed
- 600 mm/s
- Multicolor Capacity
- Up to 16-color
- Leveling Type
- Auto leveling
- Extruder Type
- Direct drive, hardened steel gears
View on Amazon: Creality K2 Pro Multicolor 3D Printer Affiliate link
The Creality K2 Pro Combo features auto leveling that probes only where your model prints. It offers a 300x300x300mm build volume and 600mm/s print speed. The system supports up to 16-color printing with CFS. Active chamber heating reaches 60°C for stable results with engineering materials. You get smart dual AI cameras for monitoring and flow tuning. This setup suits users needing large, fast, multi-color prints.
Pros
- Auto leveling probes only print areas to reduce setup time
- 300x300x300mm build volume for large prototypes
- 600mm/s print speed with 20,000 mm/s² acceleration
- Active chamber heating up to 60°C
- Supports up to 16-color printing with CFS
Cons
- Heated chamber limited to 60°C
- Heavy at 61.7 pounds
- No mention of remote control support
Good fit if
- You need a 300mm build volume for large parts
- You want auto leveling that targets specific print areas
- You require active chamber heating for engineering filaments
Skip if
- You need a chamber temperature above 60°C
- You prefer a lighter, more portable printer
- You require a compact build volume under 250mm
Verdict: Creality K2 Pro Combo 300mm Auto Level delivers high-speed, large-format multi-color printing with targeted auto leveling. It fits users who need active chamber heating for engineering materials and do not mind a heavy footprint.

Entina Tina2 Basic Mini 3D Printer
Best for: Small beginner prints and kids
- Leveling
- Auto Leveling (what this guide is about)
- Build Volume
- 100x105x100mm
- Printing Technology
- FDM
- Leveling Type
- Auto Leveling
- Features
- Fully Assembled, High Precision
- Target Audience
- Beginners, Kids
View on Amazon: Entina Tina2 Basic Mini 3D Printer Affiliate link
The Entina Tina2 Basic is a fully assembled FDM printer designed for beginners and kids. It features auto leveling and a 100x105x100mm build volume. The compact 8.6x8.6x11.4 inch frame fits small spaces. Dual Z-axis rails improve stability. You get a ready-to-print device with a magnetic build plate and offline printing support via microSD.
Pros
- Auto leveling eliminates manual bed adjustment
- Fully assembled for immediate use
- Dual Z-axis rails for stable printing
- Magnetic removable build plate
Cons
- Small 100x105x100mm build volume
- No Wi-Fi connectivity mentioned
- Limited to 2.4 inch LCD screen
Good fit if
- You need a printer for a child
- You want a fully assembled device
- You have limited desk space
Skip if
- You require large print sizes
- You need remote monitoring
- You want high-speed industrial output
Verdict: Entina Tina2 Basic Auto Leveling Mini Printer is a compact, ready-to-use option for small projects. It suits beginners who want simplicity and auto leveling without complex setup.

Creality SPARKX Multicolor 3D Printer
Best for: Auto-leveling multi-color printing
- Leveling
- Auto Leveling (what this guide is about)
- Build Volume
- 260 x 260 x 255 mm
- Leveling Type
- Auto-leveling
- Color Printing
- Multi-Color
- Features
- High Speed
- Dimensions
- 16.6 × 17.9 × 18.5 inches
View on Amazon: Creality SPARKX Multicolor 3D Printer Affiliate link
The Creality SPARKX i7 Combo features auto-leveling for hassle-free setup. It offers a 260 x 260 x 255 mm build volume and multi-color printing with CFS Lite. The unit arrives 95% pre-assembled, allowing you to start printing within five minutes. An AI camera monitors prints for failures, while quiet night mode supports overnight operation. This printer suits users seeking automated leveling and color capability.
Pros
- Auto-leveling system simplifies bed preparation
- 260 x 260 x 255 mm build volume
- Multi-color printing with CFS Lite
- 95% pre-assembled for quick start
- AI camera detects print failures
Cons
- Smaller 260 mm build volume than competitors
- Heavier 33.1 pound build limits portability
- CFS Lite system may have limited filament compatibility
Good fit if
- You want auto-leveling without manual adjustment
- You need multi-color prints for gifts
- You prefer a pre-assembled setup
Skip if
- You require large format printing over 260 mm
- You need full assembly for customization
- You prefer lighter, portable units
Verdict: The Creality SPARKX i7 Combo fits users who want auto-leveling and multi-color prints without manual bed adjustment. It suits those who value a pre-assembled unit with AI monitoring over larger build volumes.
Specifications side by side
| Spec | Entina Tina2C Mini 3D Printer | FLASHFORGE Adventurer 5M CoreXY 3D Printer | Creality Ender 3 V3 SE | Creality K2 Pro Multicolor 3D Printer | Entina Tina2 Basic Mini 3D Printer | Creality SPARKX Multicolor 3D Printer |
|---|---|---|---|---|---|---|
| Build Volume | 3.9" x 3.9" x 3.9" | 220x220x220mm | not stated | 300×300×300mm | 100x105x100mm | 260 x 260 x 255 mm |
| Print Speed | not stated | Max 600mm/s | 250mm/s | 600 mm/s | not stated | not stated |
| Printing Technology | not stated | not stated | not stated | not stated | FDM | not stated |
| Multicolor Capacity | not stated | not stated | not stated | Up to 16-color | not stated | not stated |
| Leveling Type | Auto Leveling | Fully Auto Leveling | CR Touch Auto Leveling | Auto leveling | Auto Leveling | Auto-leveling |
| Motion Structure | not stated | CoreXY | not stated | not stated | not stated | not stated |
| Extruder Type | not stated | 280°C Direct Extruder | not stated | Direct drive, hardened steel gears | not stated | not stated |
| Chamber Heating | not stated | not stated | not stated | Up to 60°C | not stated | not stated |
| Color Printing | not stated | not stated | not stated | Multi-Color | not stated | Multi-Color |
| Compatible Material | PLA | not stated | not stated | not stated | not stated | not stated |
| Structure | not stated | CoreXY | not stated | not stated | not stated | not stated |
| Leveling | Auto Leveling | Auto Leveling | Auto Leveling | Auto Leveling | Auto Leveling | Auto Leveling |
| Features | Wi-Fi, Fully Assembled | High Speed | not stated | High Speed, Built-in Camera, Heated Chamber | Fully Assembled, High Precision | High Speed |
| Target Audience | Beginners, Kids | not stated | not stated | not stated | Beginners, Kids | not stated |
| Color | Orange/Yellow/Pink/Purple | Black | Ender 3 SE Pro | Black | Grey | !silver |
| Dimensions | 11.4 × 8.6 × 8.6 inches | 15.8 × 14.3 × 17.6 inches | 13 × 13 × 16 inches | 17 × 20 × 18 inches | 11.4 × 8.6 × 8.6 inches | 16.6 × 17.9 × 18.5 inches |
| Weight | not stated | 22 pounds | 19.8 pounds | 61.7 pounds | 6 pounds | 33.1 pounds |
| Model | not stated | Adventurer 5M | Creality Ender 3 V3 SE | K2 Pro Combo | TINA2 BAISC-TF Card | not stated |
| Size | not stated | not stated | Ender 3 SE Pro | not stated | not stated | not stated |
Frequently asked questions
Does auto leveling remove the need to adjust bed screws manually?
Yes, it eliminates manual screw adjustments. Sensors map the build plate and adjust the nozzle height automatically. This ensures a consistent first layer without you touching the screws. Models like the Entina Tina2C Mini and FLASHFORGE Adventurer 5M use this to simplify setup for beginners.
How does auto leveling improve print adhesion?
It maintains a uniform gap between the nozzle and the build plate. By mapping the surface, the printer compensates for unevenness. This consistency prevents poor adhesion, warping, or detached prints. The Creality Ender 3 V3 SE uses CR Touch leveling to help ensure reliable first layers.
Is auto leveling necessary for high-speed printing?
It is highly recommended for high-speed models. Rapid movement requires precise nozzle height control to avoid defects. Automated leveling ensures the first layer is perfect before speed increases. The FLASHFORGE Adventurer 5M and Creality K2 Pro both feature auto leveling to support their 600mm/s print speeds.
Can auto leveling handle multi-color printing workflows?
Yes, it supports multi-color systems by ensuring stable first layers. Inconsistent beds cause filament shifting or adhesion issues in complex prints. Multi-color printers like the Creality K2 Pro Combo and Creality SPARKX include auto leveling to maintain quality during intricate, multi-material jobs without manual intervention.
Do all auto leveling printers come fully assembled?
Many do, but it varies by model. Fully assembled units reduce initial setup time. The Entina Tina2C Mini and Entina Tina2 Basic are noted as fully assembled. This complements auto leveling by removing other setup hurdles, making them ideal for beginners and kids who want immediate printing capability.
Does auto leveling work with heated chambers?
Yes, it functions independently of chamber heating. While heated chambers stabilize temperature for engineering materials, auto leveling manages nozzle distance. The Creality K2 Pro Combo combines both features. It uses auto leveling for bed consistency while the heated chamber aids in printing with materials that require thermal stability.
Is auto leveling better for small or large print volumes?
It benefits both sizes by ensuring flatness across the entire bed. Small printers like the Entina Tina2C Mini use it for ease of use. Larger machines like the Creality K2 Pro benefit from it to manage larger surface areas. Consistent leveling prevents edge lifting in big prints.
Does auto leveling require specific filament types?
No, it works with standard filaments like PLA. The system adjusts physical height, not material properties. The Entina Tina2C Mini supports PLA, while others handle various materials. Auto leveling focuses on the mechanical gap, ensuring proper adhesion regardless of whether you are printing basic PLA or engineering-grade plastics.