HOCENWAY Fly ADXL345 Accelerometer USB Board 3D Printer Review: Specs, Pros and Cons
As an Amazon Associate we earn from qualifying purchases. Links on this page are affiliate links.
This hocenway fly adxl345 accelerometer USB board 3d printer review covers a compact sensor module built for Klipper firmware users. It connects via USB Type-C for straightforward integration with your host machine. The board measures resonance frequencies across printer axes to help auto-adjust input shaping, which can refine print quality. Physically, it is small, measuring 0.81 inches in length and 0.61 inches in width. It weighs just 0.35 ounces and stands 0.2 inches tall. This minimal footprint allows it to fit easily onto most hotend assemblies without adding significant bulk or weight to your moving carriage.
What stands out
- USB Type-C connection for simple plug-and-play setup
- Designed specifically for Klipper firmware input shaping
- Compact dimensions: 0.81 x 0.61 x 0.2 inches
- Lightweight at 0.35 ounces for minimal inertial impact
- Compatible with Raspberry Pi and Gemini V1/V2/V3 hosts
Who it fits
Good fit for
You should consider this module if you run Klipper on a Raspberry Pi or a Gemini board. It is ideal for users who want to reduce vibration artifacts without complex wiring. The USB connection simplifies the process of measuring axis resonance. If your current setup struggles with ringing or ghosting, this sensor helps identify the frequencies that need damping. The small size ensures it does not interfere with your toolhead mechanics. It is a practical solution for makers who value clean prints and easy hardware integration.
Who should skip it
Look elsewhere if you do not use Klipper firmware. This board is designed for input shaping, which is not standard in Marlin or other firmwares. You also need a compatible host like a Raspberry Pi or Gemini board to process the data. If you lack the technical knowledge to configure input shaping parameters, the sensor will not help you. It is not a standalone solution. You must have the software environment ready to interpret the accelerometer readings. Without that, this hardware provides no benefit.
Verdict: This sensor is a precise tool for Klipper users who need to tune their machines. It fits well into setups that already have the necessary host hardware.
Key specs explained
USB Type-C connection
This interface allows you to plug the sensor directly into your host computer without extra drivers. It simplifies setup for Klipper firmware users by providing a standard, reliable link. You can connect it quickly to Raspberry Pi or Gemini boards. This eliminates the need for complex wiring or serial adapters, making installation faster and more stable for your 3D printer setup.
ADXL345 accelerometer sensor
This chip detects vibration patterns across different printer axes. It measures resonance frequencies so the firmware can automatically adjust input shaping parameters. This process reduces ringing and artifacts in your prints. You benefit from smoother surfaces and higher detail without manual tuning. It is a standard tool for optimizing print quality in modern Klipper-based machines.
0.61 inches width
This narrow profile ensures the board fits into tight spaces on your printer frame or host enclosure. You can mount it near the hotend or on the gantry without obstructing moving parts. The compact size is ideal for small printers or those with limited clearance. It allows for precise positioning to capture accurate vibration data from the print head.
0.2 inches height
The low profile prevents interference with the Z-axis or other mechanical components during movement. You can install it in confined areas where taller sensors might collide with the build plate or frame. This slim design is crucial for maintaining clearance in compact 3D printers. It ensures the sensor stays secure and out of the way while printing complex models.
0.35 ounces weight
This lightweight design minimizes the added mass on your moving print head. Less weight reduces inertia, allowing faster acceleration and deceleration without introducing new vibrations. It is particularly beneficial for high-speed printing on core XY or delta printers. You avoid compromising print speed or quality by adding bulky components to the toolhead assembly.
Compact Design and Build Details
According to the listing, the HOCENWAY Fly ADXL345 USB Accelerometer is a small module measuring 0.81 inches in length, 0.61 inches in width, and just 0.2 inches in height. This minimal footprint means you can mount it near your hotend or toolhead without taking up much space. The low profile helps keep the sensor close to the vibration source, which is critical for accurate resonance detection. You do not need to worry about bulky brackets or large enclosures interfering with your printer’s mechanics.
The board weighs only 0.35 ounces. This light weight ensures that adding the sensor does not significantly alter the moving mass of your printer axes. For Klipper users, keeping the moving mass low helps maintain responsiveness and reduces strain on your stepper motors. The USB Type-C connection is integrated directly into the board layout. This design choice allows for a clean, direct plug into your host computer, such as a Raspberry Pi or Gemini controller, without requiring separate cables or complex wiring harnesses.
The listing does not specify the materials used in the casing or the finish of the PCB. It focuses on the functional dimensions and connection type. You should assume the build is standard for a small electronic sensor module. The simplicity of the design prioritizes function over form. You get a straightforward interface for measuring axis resonance. This helps you adjust input shaping parameters to improve print quality. The compact size and light weight make it easy to integrate into most 3D printer setups without major modifications.
Setup and Daily Operation Guide
Setting up this accelerometer involves connecting the USB Type-C cable directly to your host computer. You do not need to configure complex wiring or add separate drivers for the interface. This straightforward connection simplifies the initial installation for Klipper firmware users. The listing specifies compatibility with Raspberry Pi and Gemini V1, V1.1, V2, and V3 boards. You can also use it with other machines that support Klipper. The compact dimensions of 0.81 by 0.61 by 0.2 inches allow you to mount the module near the hotend without taking up much space. Its light weight of 0.35 ounces adds minimal mass to your moving assembly.
In daily use, the sensor measures resonance frequencies across your printer’s different axes. This data helps the firmware automatically adjust input shaping parameters. By compensating for resonance, the system aims to improve overall print quality. You do not need to manually tune these settings for every print job. The USB connection ensures you can quickly assemble and disassemble the module if needed. This convenience supports a better user experience during routine maintenance or upgrades. For detailed configuration steps, the manufacturer directs you to the Mellow Klipper documentation online. This resource covers advanced USB accelerometer settings specific to this hardware. The package includes one FLY-ADXL345 Accelerometer USB Board module. You simply plug it in and let the firmware handle the rest. This design focuses on ease of use and reliable performance for automated tuning.
Before You Buy This Sensor
You need a host machine that supports Klipper firmware to use this module. It works with Raspberry Pi units and Gemini V1, V1.1, V2, and V3 boards. Verify your specific hardware is listed as compatible before purchasing. You will also need a USB Type-C cable to connect the sensor to your computer. The board itself does not include mounting hardware. You must source your own screws or brackets to attach it near your hotend. Regular maintenance is minimal since the device has no moving parts. Just keep the USB port clean from dust. This accelerometer fits into the broader category of 3D printer tuning tools. It complements other making tools by helping you refine input shaping settings. If you are already using a supported host, this small board adds precision to your setup without taking up much space.
Check before you buy
- Confirm your host machine runs Klipper firmware.
- Check if your Raspberry Pi or Gemini board is compatible.
- Ensure you have a USB Type-C cable ready.
- Plan where to mount the sensor near the hotend.
- Verify you have mounting hardware for installation.
The product at a glance
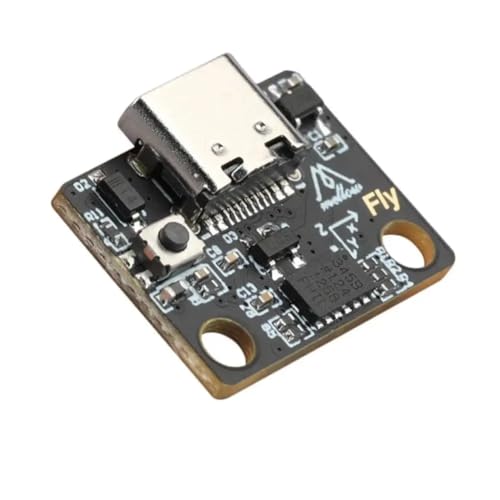
HOCENWAY Fly ADXL345 USB Accelerometer
Best for: Klipper users needing resonance calibration
- Dimensions
- 0.81 × 0.61 × 0.2 inches
- Weight
- 0.35 ounces
View on Amazon: HOCENWAY Fly ADXL345 USB Accelerometer Affiliate link
This HOCENWAY module is an ADXL345 accelerometer with a USB Type-C connection, designed for Klipper firmware 3D printers. It measures resonance frequency across printer axes to help automatically adjust input shapers, improving print quality. The compact board measures 0.81 by 0.61 by 0.2 inches and weighs 0.35 ounces. It connects easily to Raspberry Pi and Gemini boards for quick assembly.
Pros
- USB Type-C connection for quick assembly
- Measures resonance frequency to adjust input shaper
- Compatible with Raspberry Pi and Gemini V1/V1.1/V2/V3
- Compact size at 0.81 by 0.61 by 0.2 inches
Cons
- Requires Klipper firmware to function
- Limited to specific host boards like Raspberry Pi
- Single-axis measurement module only
Good fit if
- You use Klipper firmware on your 3D printer
- You need to calibrate input shapers for better print quality
- You have a Raspberry Pi or compatible Gemini board
Skip if
- You use Marlin or other non-Klipper firmware
- You do not have a compatible host board
- You need a standalone accelerometer without USB connection
Verdict: HOCENWAY Fly ADXL345 USB Accelerometer fits users running Klipper who need precise resonance calibration. It works best with Raspberry Pi or Gemini boards for automated input shaping.
Specifications side by side
| Spec | HOCENWAY Fly ADXL345 USB Accelerometer |
|---|---|
| Dimensions | 0.81 × 0.61 × 0.2 inches |
| Weight | 0.35 ounces |
Frequently asked questions
What is the HOCENWAY Fly ADXL345 USB Accelerometer best used for?
This device is primarily designed for Klipper users who need to perform precise resonance calibration on their 3D printers. It helps you auto-adjust input shaping by measuring resonance frequencies across printer axes. This ensures smoother prints and reduces artifacts caused by machine vibrations.
Does the HOCENWAY Fly ADXL345 require additional drivers for setup?
No, you do not need to configure complex wiring or add separate drivers for the interface. The board connects via USB Type-C, which provides a standard and reliable link to your host machine. This simplifies the initial installation process significantly for most users.
Which host machines are compatible with this accelerometer board?
You need a host machine that supports Klipper firmware to use this module effectively. It works specifically with Raspberry Pi units and Gemini V1, V1.1, V2, and V3 boards. You should verify your specific hardware is listed as compatible before purchasing to ensure proper function.
How small is the HOCENWAY Fly ADXL345 accelerometer module?
The module is very compact, measuring 0.81 inches in length, 0.61 inches in width, and just 0.2 inches in height. Its minimal footprint allows you to mount it easily near your hotend without taking up much space. It also weighs only 0.35 ounces.
How do you connect the HOCENWAY Fly ADXL345 to your printer?
Setting up this accelerometer involves connecting the USB Type-C cable directly to your host computer. You can plug the sensor directly into your host computer without extra drivers. This straightforward connection simplifies the initial installation for Klipper firmware users running on supported boards.
Can the HOCENWAY Fly ADXL345 help improve print quality?
Yes, it measures resonance frequencies across printer axes to help auto-adjust input shaping. This precise calibration allows your printer to compensate for vibrations, leading to cleaner prints. It fits users running Klipper who need precise resonance calibration for better overall print results.
Is this accelerometer suitable for beginners in 3D printing?
This device is best suited for users already running Klipper firmware who need precise resonance calibration. It is not a plug-and-play solution for all printers. You must have a compatible host like a Raspberry Pi or Gemini board to utilize its features effectively.